Showing posts with label Sparkles. Show all posts

December 23, 2014

Sparkling Green Holiday Nails

Today's manicure was very stright up & basic. I got my usual acrylic fill, with a sparkling green gel polish to keep im theme with the holiday season. 


To create this glittering look we started with a shimmering teal gel polish as a base coat. Once that was set by UV light we began to apply the sparkling green gel polish. I used one coat for the base coat & 3 coats of sparkles to really make sure the entire nail is opaque.

This is a very "basic" look but really quite effective. I have been getting many compliments on my sparkling christmas nails. They arent too over the top but enough to notice.

You can alway add extra Christmas decore to your nails by painting on a snowman or maybe a Santa hat. Get creative with yout nails & let your imagination run free.

Merry Christmas everyone!! Have a safe & happy holiday!!! 
Peace & Luv

December 1, 2014

Nails... Gel Polish Manicure- The Pro's & Con's

About a week and a half ago I went to get my acrylic nails filled. While getting them done I decided to try a gel nail polish instead of my regualar polish & top coat.

The only reason I decided to switch was because it was my birthday the following week & thought I would treat myself to something new. I had gotten nails painted with gel once before but my experience with them was a bit of a toss up. I always enjoyed the look of shiney gel nails, however I was never super excited about the price. (Almost an extra $15 in my case.) I also found that the gel polish would fade and slowly rub off when I would use rubbing alcohol while doing make up. Luckily this time around I havent had the same problem. 

This time Im actually really enoying the look and duriblity of my nails. They seem to be a bit stronger & dont seem to be chipping or fading. (1.5 weeks) They are still beautiful & shiney- just a little grown out.


Earlier today I was reading an article about the pros & cons of wearing gel nails or polish. It seemed to me that the biggest concerns are the damaged caused to your nail beds, the frequent soaking of nails/hands in acetone to remove gel polish or gel nails and hands being left directly under UV light to dry. 

Yes, after a prolonged period of time you could begin to see damage to your nails, but that is with anytime of false nail. It helps to ensure you are getting them done somewhere where they know how to do gel nails properly. 

The acetone was a concer because of how much it dries out the nails and skin. I believe it is even absorbed into the blood stream through frequent skin contact. May salons have begun to use acetone soak pads on each nail instead of having the client completely submerge thier whole hand into the acetone.

The UV light helps to cure & dry the nails, layer by layer- which basically means yout hands sit under a UV lamp for half the time you get your nails done. The UV rays, of course are the best thing to be having our hands sit under. As much as there isnt too much of a solution right now, some brands have begun to use LED light which is much better for our skin.

When wearing false nails for an extended period of time you also need to make sure that there are no cracks or spaces for water to leak in. Not only does this allow yout nails to come off faster but it can cause even more damage to the nails, including fungal infections... Yuck. Only get your nails "filled" once or twice, not as long as they will last.


will admit when I get them filled I will probably stick with the gel polish. If you have any questions or concerns about a new product or trying a new product always make sure to research & ask the questions you want answered. 

Peace & Luv

May 26, 2014

Nails... Miso Sparkly

Recently I had my nails filled. I wanted to get my nails painted a shade I didn't usually go with, so I chose OPI's Miso Happy With This Color. After a few days I needed to mix it up a bit and of course add some sparkles.


For more pictures and how I created this look, follow the link below...

April 24, 2014

Nails... William's A Cut Above (Review & How To)

Yesterday I got myself a new set of acrylic nails. When I got my nails done they were painted with OPI's William Tell Me About OPI. I then wanted to take my nails from basic to glitter so I added Essie's A Cut Above glitter top coat.


For more pictures, how to create these nails & a review, please follow the link below...

November 14, 2013

Bobbi Brown Old Hollywood Collection Holiday 2013

Bobbi Brown has released their holiday collection for 2013. This collection is called Old Hollywood. You will find many rich golds & browns in this collection. As well as tons of shimmer in almost everything from eyeshadows to nail polishes.


For more pictures and info follow the link below...

May 5, 2013

Revlon Nail Art Moon Candy Polish 2013

"Revlon Nail Art Moon Candy allows you to get a gorgeous, iridescent effect inspired by outer space. The holographic glitter top coat is illuminated by the dark cream base coat, giving your nails a multi-dimensional look. The dual-ended package gives you everything you need to create a fun, cosmic look."  -Revlon.ca 

This week while I was grocery shopping a nail polish caught my eye. It was the Nail Art Moon Candy polish by Revlon. The bottle is dual ended and beautifully amazing to look at. I love these polishes!!

I had to try them right away so I purchased a couple colors and tried them that night.


For my review & more pictures follow the link below...

May 31, 2012

OPI Muppet's Polish Review

A while ago, I was getting my hair done, and searching through the polish bin at Fringe when I realized they had 2 sparkling shades I was looking for from OPI's Muppet Collection. There are so many polishes in this collection that look so beautiful, I wish I could have tired them all!!

Today I am going to review Gone Gonzo! & Gettin Miss Piggy With It. (Haha, I looooove the names of these polishes. They make me giggle.)


For my review & more pictures follow the link below...

May 3, 2012

OPI Nicki Minaj Nail Polish Review

A couple days ago I got my hair cut & dyed at the salon, Fringe my sister works at. (I will post pictures of my hair when it is completely done.)

Fringe usually has some sort of display or bin of nail polish by China Glaze or OPI. To my surprise they had a couple colors I was looking for. One of them being the bright green from the Minaj collection.


Today I will be reviewing 3 polishes from the collection. (Did It On Em, Super Bass Shatter, & Save Me)
Follow the link below for review & pictures...

July 6, 2011

Nails... Poof! Fairy Dust.

I love switching up my nail polish, and trying different looks using bright, usually neon colors. However recently I have been really into a simple sparkling look. I called this look Poof! Fairy Dust, because I believe this is what fairy power would shine like, but mostly because it's the name of the polish. (lol)

I have been using sparkle polishes on my nails, finishing it with a top coat. I think its a dazzling look, but not too over the top. You can choose any color, to match whatever you choose. I personally like sparkles that are multi-colored. Here are the nails I am rockin this week...


I used China Glaze's Fairy Dust, one of my favorite clear rainbow sparkles. These nails look amazing in the sun. Sadly I couldn't sneak a pic because it was a cloudy day. :(

 Hopefully Poof! Fairy Dust inspires you to switch it up and try something new. :)

Peace & Luv

June 14, 2011

Sparkling Nails

Here are a couple sample nails I did one night. I wanted to try different spark textures and sizes on nails. I basically painted my nails either clear or which ever color glitter I was going to use. Then I simple dumped the glitter on top of the nail trying to keep it as neat as possible.

Here are a few different ones I created...


Once you have the whole nail covered in sparkles, and it dries for a couple of minutes you can apply your clear coat. You may have to use more top coat, because of the texture and amount to cover. With this said, these nails unfortunately do take longer to dry. (I hate that too.)

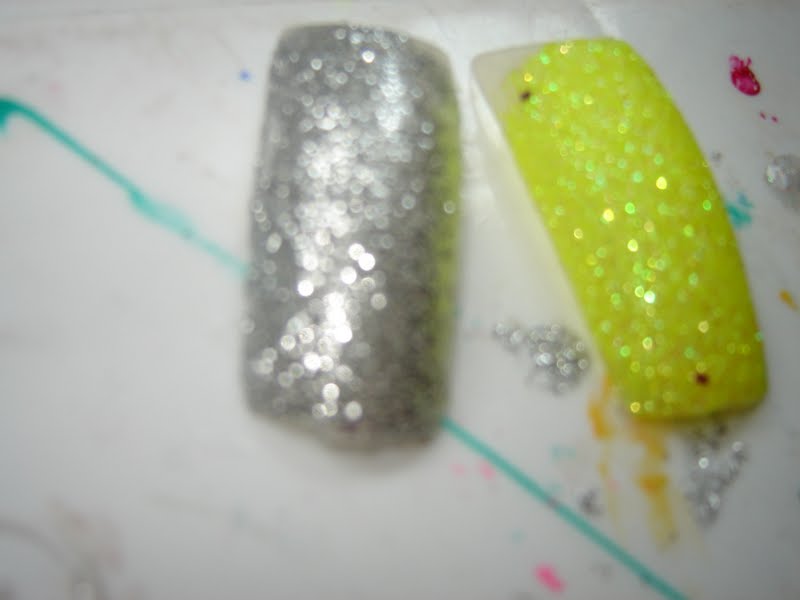
 Yellow: I painted this nail with a yellow base coat. Then added my neon yellow sparkles. These ones were very small and fine sparkles. These would probably last longer, then chunky glitter.
 Silver: I used a clear base coat on this nail. Sprinkled my sparkles on top. These were the smallest and finest sparkles I used which made it harder to get full coverage, however it made it easier to apply a top coat, and would probably last longer on the nails.
 I used a clear coat for my last two nails. The glitter I used for these nails is much more thicker, and larger in shape. They give great coverage but will need a lot of clear coat and will take the longest to dry. They do however give a very unique effect.
I think nails like this would be a lot of fun for a occasion like New Years Eve or your birthday day. Great for a night out. This is a really simple nail look, with no skill level involved. Anyone can do this.

Peace & Luv

January 16, 2011

Nyx Haul'n...

I’m constantly trying to add to my makeup collections I already have, but I’m constantly buying new products I’ve never tried. Recently I hauled in some new NYX products. I bought a couple different things that I was very excited to try.